Build a Chat Application with Vuex and Firebase
Building a real time chat application used to be such a pain. You need a back end and a server to run it on… a huge undertaking in it’s own right. Not to mention polling techniques or a socket library to sync the front end with updates from the back end. These days that entire stack can be replaced with a database service like Firebase. So let’s get to building!
For this application we’ll turn to my personal favorite front end framework: Vue.js. We’ll also pull in Vuex for state management to show how easily it can be integrated with Firebase to sync all of your Firebase collections across a single application. For this tutorial I'll assume a basic familiarity with Vue.js data bindings, and won't be going into detail about how those work. For more information, head on over to the Vue documentation.
Project Setup
Make sure you have vue-cli installed before initializing the project and installing Vuex and Firebase:
npm install -g vue-cli # if not already installed
vue init webpack-simple vue-firebase-chat

? Project name vue-firebase-chat
? Project description A Vue.js project
? Author Your Name <your.email@domain.com>
? License MIT
? Use sass? Yes

cd vue-firebase-chat
npm install
npm install --save vuex firebase babel-polyfill
This should be enough to get us rolling. So open up the project in your favorite text editor and let’s set up a basic data store at src/store/index.js:
import Vue from 'vue';
import Vuex from 'vuex';

Vue.use(Vuex);

const state = {};

export default new Vuex.Store({
  state
});
To make sure the store is available to our app when it bootstraps, update src/main.js to pull the store into the application:
import Vue from 'vue';
import App from './App.vue';

import 'babel-polyfill';

import store from './store';

new Vue({
  el: '#app',
  store,
  render: h => h(App)
});
Setting up the Firestore
To flesh this store out, we’ll need to connect it to a firebase firestore, so head on over to the firebase website, set up an account and click Go To Console in the navigation to see your list of projects. Add a new project, and name it Vuechat.

Once the project is created, open it up and click Databases from the left hand navigation. Despite our intention of building a real-time chat application, what we actually need to set up here is a Cloud Firestore. Click the Get Started link there to open up an empty firestore database.
To lock down the database to authenticated users, click the Rules tab and paste in the following rules:
service cloud.firestore {
match /databases/{database}/documents {
match /{document=**} {
allow read, write: if request.auth.uid != null;
}
}
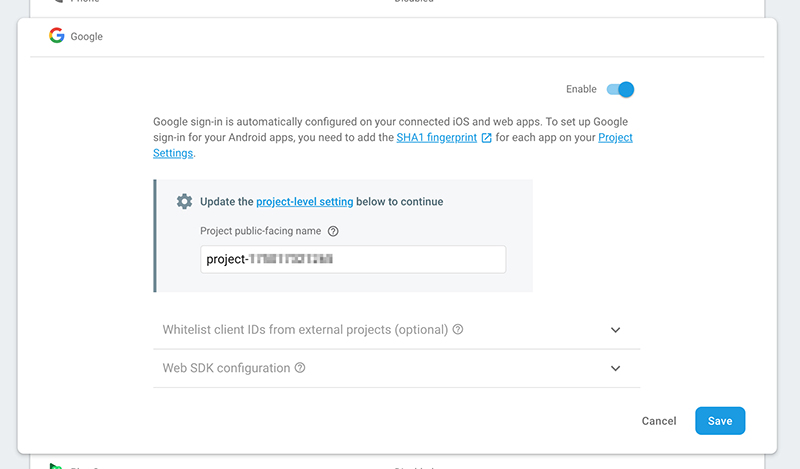
}Now that we've locked down the application to authenticated users, we need to give users a way to authenticate. We'll set up the Login component a little down the line, but for now let's configure the firestore to use Google for authentication. It's a quick and easy setup, and just about everyone has a google account these days.
Click Authentication from the sidebar navigation and open the Sign-in Method tab. From here you can enable all kinds of user authentication. As previously mentioned, let's enable Google authentication. Click Save to apply changes.
The last step in setting up our firestore is to grab the configuration object and pull it into our application's data store. Click Project Overview in the sidebar navigation, and then the Add Firebase to Your Web App button. Copy the API configuration.
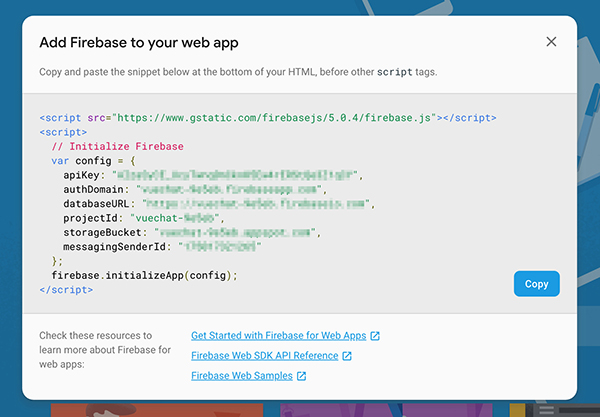
Head on back to our project files and drop the configuration object into src/store/index.js. We'll also need to pull in firebase and initialize the application. Adding the app to our store will allow use to work more easily with authentication later. At this point our store should look like this:
import Vue from 'vue';
import Vuex from 'vuex';

import firebase from 'firebase/app';

const config = {
  apiKey: "XXXXXXXXXXXXXXXXXXXXXXXXXXXXXXXXXXXXXXX",
  authDomain: "vuechat-XXXXX.firebaseapp.com",
  databaseURL: "https://vuechat-XXXXX.firebaseio.com",
  projectId: "vuechat-XXXXX",
  storageBucket: "vuechat-XXXXX.appspot.com",
  messagingSenderId: "XXXXXXXXXXXX"
};

const app = firebase.initializeApp(config);

Vue.use(Vuex);

const state = { app };

export default new Vuex.Store({
  state
});
Stubbing out Components
Now that we're connected to the firestore, let's get an authentication workflow set up. Stub out a couple components in the project: src/components/Login.vue, and src/components/Chat.Vue.
<!-- Login.vue -->
<template>
  <button class="login-button" @click="login()">Login With Google</button>
</template>

<script>
export default {
  methods: {
    login() {
      // TODO
    }
  }
};
</script>

<style language="scss">
.login-button {
  padding: 20px 36px;
  font-size: 1.2rem;
  position: fixed;
  top: 50%;
  left: 50%;
  transform: translate(-50%, -50%);
  background-color: #0365d6;
  border-radius: 4px;
  color: #fff;
}
</style>
<!-- Chat.vue -->
<template>
<div class="chat-wrapper">
<div class="chat-header">
<p>Welcome, {{ this.currentUser.displayName }}!</p>
<a href="#" @click.prevent="logout()">log out</a>
</div>
</div>
</template>
<script>
export default {
methods: {
logout() {
// TODO
}
}
}
</script>
<style lang="scss">
.chat-wrapper {
display: flex;
justify-content: center;
align-items: center;
flex-direction: column;
width: 500px;
height: 600px;
position: fixed;
top: 50%;
left: 50%;
transform: translate(-50%, -50%);
box-shadow: 0 6px 15px rgba(47,59,60,0.2);
padding: 20px;
}
.chat-header {
display: flex;
padding-bottom: 20px;
justify-content: space-between;
p {
margin: 0;
}
}
.message-list {
flex-grow: 1;
padding-right: 10px;
overflow-x: hidden;
overflow-y: auto;
}
.chat-header,
.message-list,
.chat-submit {
width: 100%;
}
.chat-submit {
padding-top: 20px;
}
.chat-submit input {
width: 100%;
padding: 10px 12px;
border: 1px solid #ddd;
}
.chat-message {
display: flex;
padding-bottom: 20px;
&:last-child {
padding-bottom: 0;
}
&__avatar {
height: 40px;
width: 40px;
border-radius: 50%;
overflow: hidden;
margin-right: 10px;
}
&__user {
color: teal;
&:after {
content: ':';
}
}
&__user,
&__message {
margin: 0;
}
}
</style>There's not a whole lot going on here yet, we're just setting up a scaffold for the functionality we'll add to the application later. We've also got all the styling we'll need for markup we'll add later, that way we can focus on building the app for the rest of the tutorial.
Next, we need to update src/App.vue to pull in our components. Replace the current contents of the file with the following:
<template>
  <div>
    <Chat v-if="currentUser && currentUser.displayName" />
    <Login v-else />
  </div>
</template>

<script>
import Login from './components/Login.vue';
import Chat from './components/Chat.vue';

export default {
  components: { Login, Chat }
};
</script>

<style lang="scss">
* {
  box-sizing: border-box;
}

body {
  font-family: 'Avenir', Helvetica, Arial, sans-serif;
  -webkit-font-smoothing: antialiased;
  -moz-osx-font-smoothing: grayscale;
  color: #2c3e50;
  margin-top: 60px;
}
h1, h2 {
  font-weight: normal;
}
ul {
  list-style-type: none;
  padding: 0;
}
li {
  display: inline-block;
  margin: 0 10px;
}
a {
  color: #42b983;
}
</style>
Once again, we've stubbed out a basic component and added some styling.
User Authentication
At this point you may be wondering where currentUser will come from, so let's set up the first Vuex module at src/store/user.js to take care of that:
import firebase from 'firebase/app';
import 'firebase/auth';

const state = {
  currentUser: {}
};

const mutations = {
  SET_USER (state, { user }) {
    state.currentUser = user;
  },
  UNSET_USER () {
    state.currentUser = {};
  }
};

const actions = {
  init ({ commit, rootState }) {
    rootState.app.auth().onAuthStateChanged((user) => {
      if (user) {
        commit('SET_USER', { user });
      } else {
        commit('UNSET_USER');
      }
    });
  },
  login ({ rootState }) {
    var authProvider = new firebase.auth.GoogleAuthProvider();
    return rootState.app.auth().signInWithPopup(authProvider);
  },
  logout ({ rootState }) {
    rootState.app.auth().signOut();
  }
};

export default { namespaced: true, state, mutations, actions };
There's a good amount happening here, so let's break it down.
For our user module, we need a couple mutations to apply changes to the store. SET_USER sets the current user to the one provided via authentication, and UNSET_USER will clear it on logout.
The init action will end up doing the bulk of the heavy lifting in this module, setting up a watcher on the firebase/auth module. We need to do this on our initialized firebase app, which is why we passed it to the store back in src/store/index.js. Since we now have access to the app through rootState, the init action will be able to set the watcher on it and commit mutations to the user module's state on changes to the currently authenticated user.
The login and logout actions use the API on the rootState app to trigger login and logout. For the login action, we're taking advantage of the built in authentication modal in the firebase/auth API to allow the user to sign in with Google, taking nearly all of the heavy authentication lifting off our plate.
Now that we have a user module we need to pull it into src/store/index.js before we can use it:
// ... Vue/Firebase imports

import user from './user';

// ... Firebase/Vuex store configuration

export default new Vuex.Store({
  state,
  modules: { user }
});
The user module should now be available in the datastore for our components.
Next up let's flesh out src/App.vue, src/components/Login.vue, and src/components/Chat.vue so they can take advantage of the new user module and allow the user to log in and out.
For src/App.vue we only need to map the currentUser state. This should complete our v-if statement in the template and allow the login button to show until a user has logged in. At that point, the Login component will hide itself and show the Chat component.
import Login from './components/Login.vue';
import Chat from './components/Chat.vue';

import { mapState } from 'vuex';

export default {
  computed: {
    ...mapState({
      currentUser: state => state.user.currentUser
    })
  },
  components: { Login, Chat }
};
In src/Login.vue we don't need to map any state. Instead we have a couple of action dispatches. On component creation we'll trigger the user/init action where we set the watcher that keeps the current user in sync. For the login method we dispatch the user/login action to trigger the Google login modal and allow the user to authenticate.
// src/components/Login.vue <component/>
export default {
  created() {
    this.$store.dispatch('user/init');
  },
  methods: {
    login() {
      this.$store.dispatch('user/login');
    }
  }
};
Lastly, let's update src/components/Chat.vue. We're not quite ready to add chat functionality, but the Chat component will show the currently logged in user's name, and provide a logout button. To make this happen we need to map state to the current user and trigger the user/logout action when the logout link is clicked.
import Vue from 'vue';
import { mapState } from 'vuex';

export default {
  computed: {
    ...mapState({
      currentUser: state => state.user.currentUser
    })
  },
  methods: {
    logout() {
      this.$store.dispatch('user/logout');
    }
  }
};
At this point, we should be able to log users in and out, showing only the appropriate component depending on the currentUser state.
From the terminal, run npm run dev to start up the application in your browser and test it out!
Chat Functionality
At long last it's time to build out our realtime chat functionality. Now that we have an authenticated user, it's actually pretty easy to accomplish.
The first thing we'll need to do is add a database reference to the store. That way we'll be able to create individual collection references within store modules that will allow us to get data from the database and push new documents to the collection. Open up src/store/index.js and update the lines after firebase.initializeApp(config); to the following:
// ... Vue and main Firestore import

import 'firebase/firestore';

// ... Additional imports and Firestore configuration

const db = firebase.firestore();
const settings = { timestampsInSnapshots: true };

db.settings(settings);

Vue.use(Vuex);

const state = { app, db };

// ... export store
Here we've imported the firebase/firestore module and created a reference to the database that we can pass to the store for use in modules. The settings object will tell the firestore to go ahead and store timestamps in the database. Without this line, firebase will throw an error in the console asking you to update your app to include it.
Next we need a new module for the data store to manage chat messages, so go ahead and create a file at src/store/messages.js with the following contents:
const state = {
  all: []
};

const mutations = {
  ADD_MESSAGE (state, message) {
    state.all.push(message);
  }
};

const actions = {
  init ({ commit, rootState }) {
    let messagesRef = rootState.db.collection('messages');

    messagesRef.orderBy('created_on').onSnapshot((snapshot) => {
      snapshot.docChanges().forEach((change) => {
        if (change.type === 'added') {
          commit('ADD_MESSAGE', {
            ...change.doc.data(),
            id: change.doc.id
          });
        }
      });
    });
  },
  send ({ commit, rootState }, { username, image, text }) {
    let messagesRef = rootState.db.collection('messages');

    messagesRef.add({
      username,
      image,
      text,
      created_on: new Date()
    });
  }
};

export default { namespaced: true, state, mutations, actions };
Much like the user module, we set up a state object, populate it with the data object we'll use later in our components, and then populate our mutations and actions.
We only have a single mutation, ADD_MESSAGE. This will be called every time there is a new message to add to the store.
Since we're using hot reloads as part of the vue-cli project, this method will end up being called for each chat message on a code refresh. The state, however, will remain in the browser. This will result in duplicated chat messages when hot reloads take place. You could mitigate this by doing a check against the message passed to the mutation and only adding it if it's ID doesn't exist in the state object already. This isn't an issue in a production app, however, since the app won't be hot reloaded there.
The init action will be called in the created lifecycle callback of the Chat component, similar to the user/init dispatch in the Login component, and will initialize any chat messages currently in the database. After pulling in firebase, we create a reference to the messages collection using the db object on rootState, and start listening for changes in the database. This will work for the initial loading of the app as well as any new messages that are added after we've bootstrapped our instance of the chat application.
For more information about realtime updates to the firestore, take a gander at the documentation.
Because these messages can come back in an arbitrary order we're also going to need to use the created_on attribute to sort the chat messages before calling the mutation to add them to the store. We'll add this attribute when we create a message in the next action.
You may want to handle this with cloud functions in the firebase console for a production application to ensure that users in different timezones don't submit chat messages with inconsistent timestamps. You could then use a library like moment.js to adjust chat timestamps for the user's local timezone on the front end.
The send action will take an object containing the user name, avatar image url, and message text, then pass those to a collection reference to add the new message. Since we're watching for updates after the init action is triggered, added messages will be picked up automatically and added via mutation in the onSnapshot handler.
Now that we have a module for messages, let's add that src/store/index.js.
// .. Vue and Firebase imports

import user from './user';
import messages from './messages';

// ... Vuex and Firebase configuration

export default new Vuex.Store({
  state,
  modules: { user, messages }
});
Almost done! Time to update the Chat component. We'll need to add some markup to enter and display chat messages, along with some methods to dispatch the correct store actions. Update the template and javascript in src/components/Chat.vue to the following:
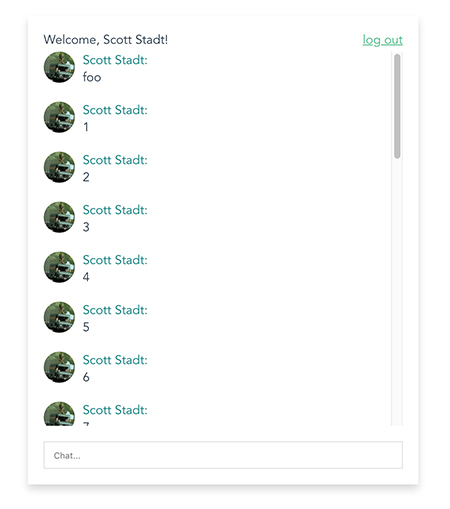
<div class="chat-wrapper">
  <div class="chat-header">
    <p>Welcome, {{ currentUser.displayName }}!</p>
    <a href="#" @click.prevent="logout()">log out</a>
  </div>
  <div class="message-list" ref="chatList">
    <div v-for="message in messages" class="chat-message">
      <img class="chat-message__avatar" :src="message.image" />
      <div class="chat-message__body">
        <p class="chat-message__user">{{ message.username }}</p>
        <p class="chat-message__message">{{ message.text }}</p>
      </div>
    </div>
  </div>
  <form class="chat-submit" @submit.prevent="addMessage">
    <input type="text" class="new-message" v-model="message" placeholder="Chat..." />
  </form>
</div>
Pretty simple updates in the template, we just need to add a form to submit new messages and a list to output them.
import Vue from 'vue';
import { mapState } from 'vuex';

export default {
  created() {
    this.$store.dispatch('messages/init');
  },
  data() {
    return {
      message: ''
    };
  },
  computed: {
    ...mapState({
      messages: state => state.messages.all,
      currentUser: state => state.user.currentUser
    })
  },
  methods: {
    logout() {
      this.$store.dispatch('user/logout');
    },
    addMessage() {
      if (this.message !== '') {
        this.$store.dispatch('messages/send', {
          username: this.currentUser.displayName,
          image: this.currentUser.photoURL,
          text: this.message
        });
        this.message = "";
      }
    }
  }
};
The JavaScript updates are not too cumbersome either. We added a created lifecycle callback to dispatch the messages/init action and start up the watcher. We also added the messages to the state mapping, so they will be available on the component. Finally, there is an addMessage function that will create a message object that can be dispatched to the messages/send action. Once we've submitted the message we can go ahead and clear the chat input so the user can type in a fresh new message.
If you recall, the message/send action will pull in those values, add a timestamp, and then send that message to the database. The watcher that was set up in the messages/init action will then trigger a mutation once the firestore informs the watcher that there is a new message.
So now our chat application is up and running. Your app should be able to send messages and update the list when new messages are added. That being said, we still have one issue: if you add more messages than can fit in the container they start running off below the it, out of view… that's no good.
We can fix this by listening to messages data, and scrolling the div to the bottom after a new message is added. To make sure we perform the scroll after the message has been added to the DOM, we can take advantage of the Vue.nextTick method. Add the following watcher to the component in src/components/Chat.vue:
import Vue from 'vue';
import { mapState } from 'vuex';

export default {
  // ...
  watch: {
    messages() {
      Vue.nextTick(() => {
        this.$refs.chatList.scrollTop = this.$refs.chatList.scrollHeight;
      });
    }
  },
  // ...
}
In case you missed it, the markup for the chat message list already includes ref="chatList", so we can tap into the native DOM API and scroll this div to the bottom after receiving a new chat message.
Congradulations! You now have a full chat application with centrally managed data in a Vuex store, all powered by firebase's firestore. No back end necessary!
Like this post? Have a suggestion to make the code better? Leave me a comment below, I would love to hear from you!